> ## Documentation Index
> Fetch the complete documentation index at: https://developers.takeprofit.com/llms.txt
> Use this file to discover all available pages before exploring further.

# Creating Your First Widget

> This guide provides a comprehensive, step-by-step process to create your first custom widget using the TakeProfit Widget SDK.

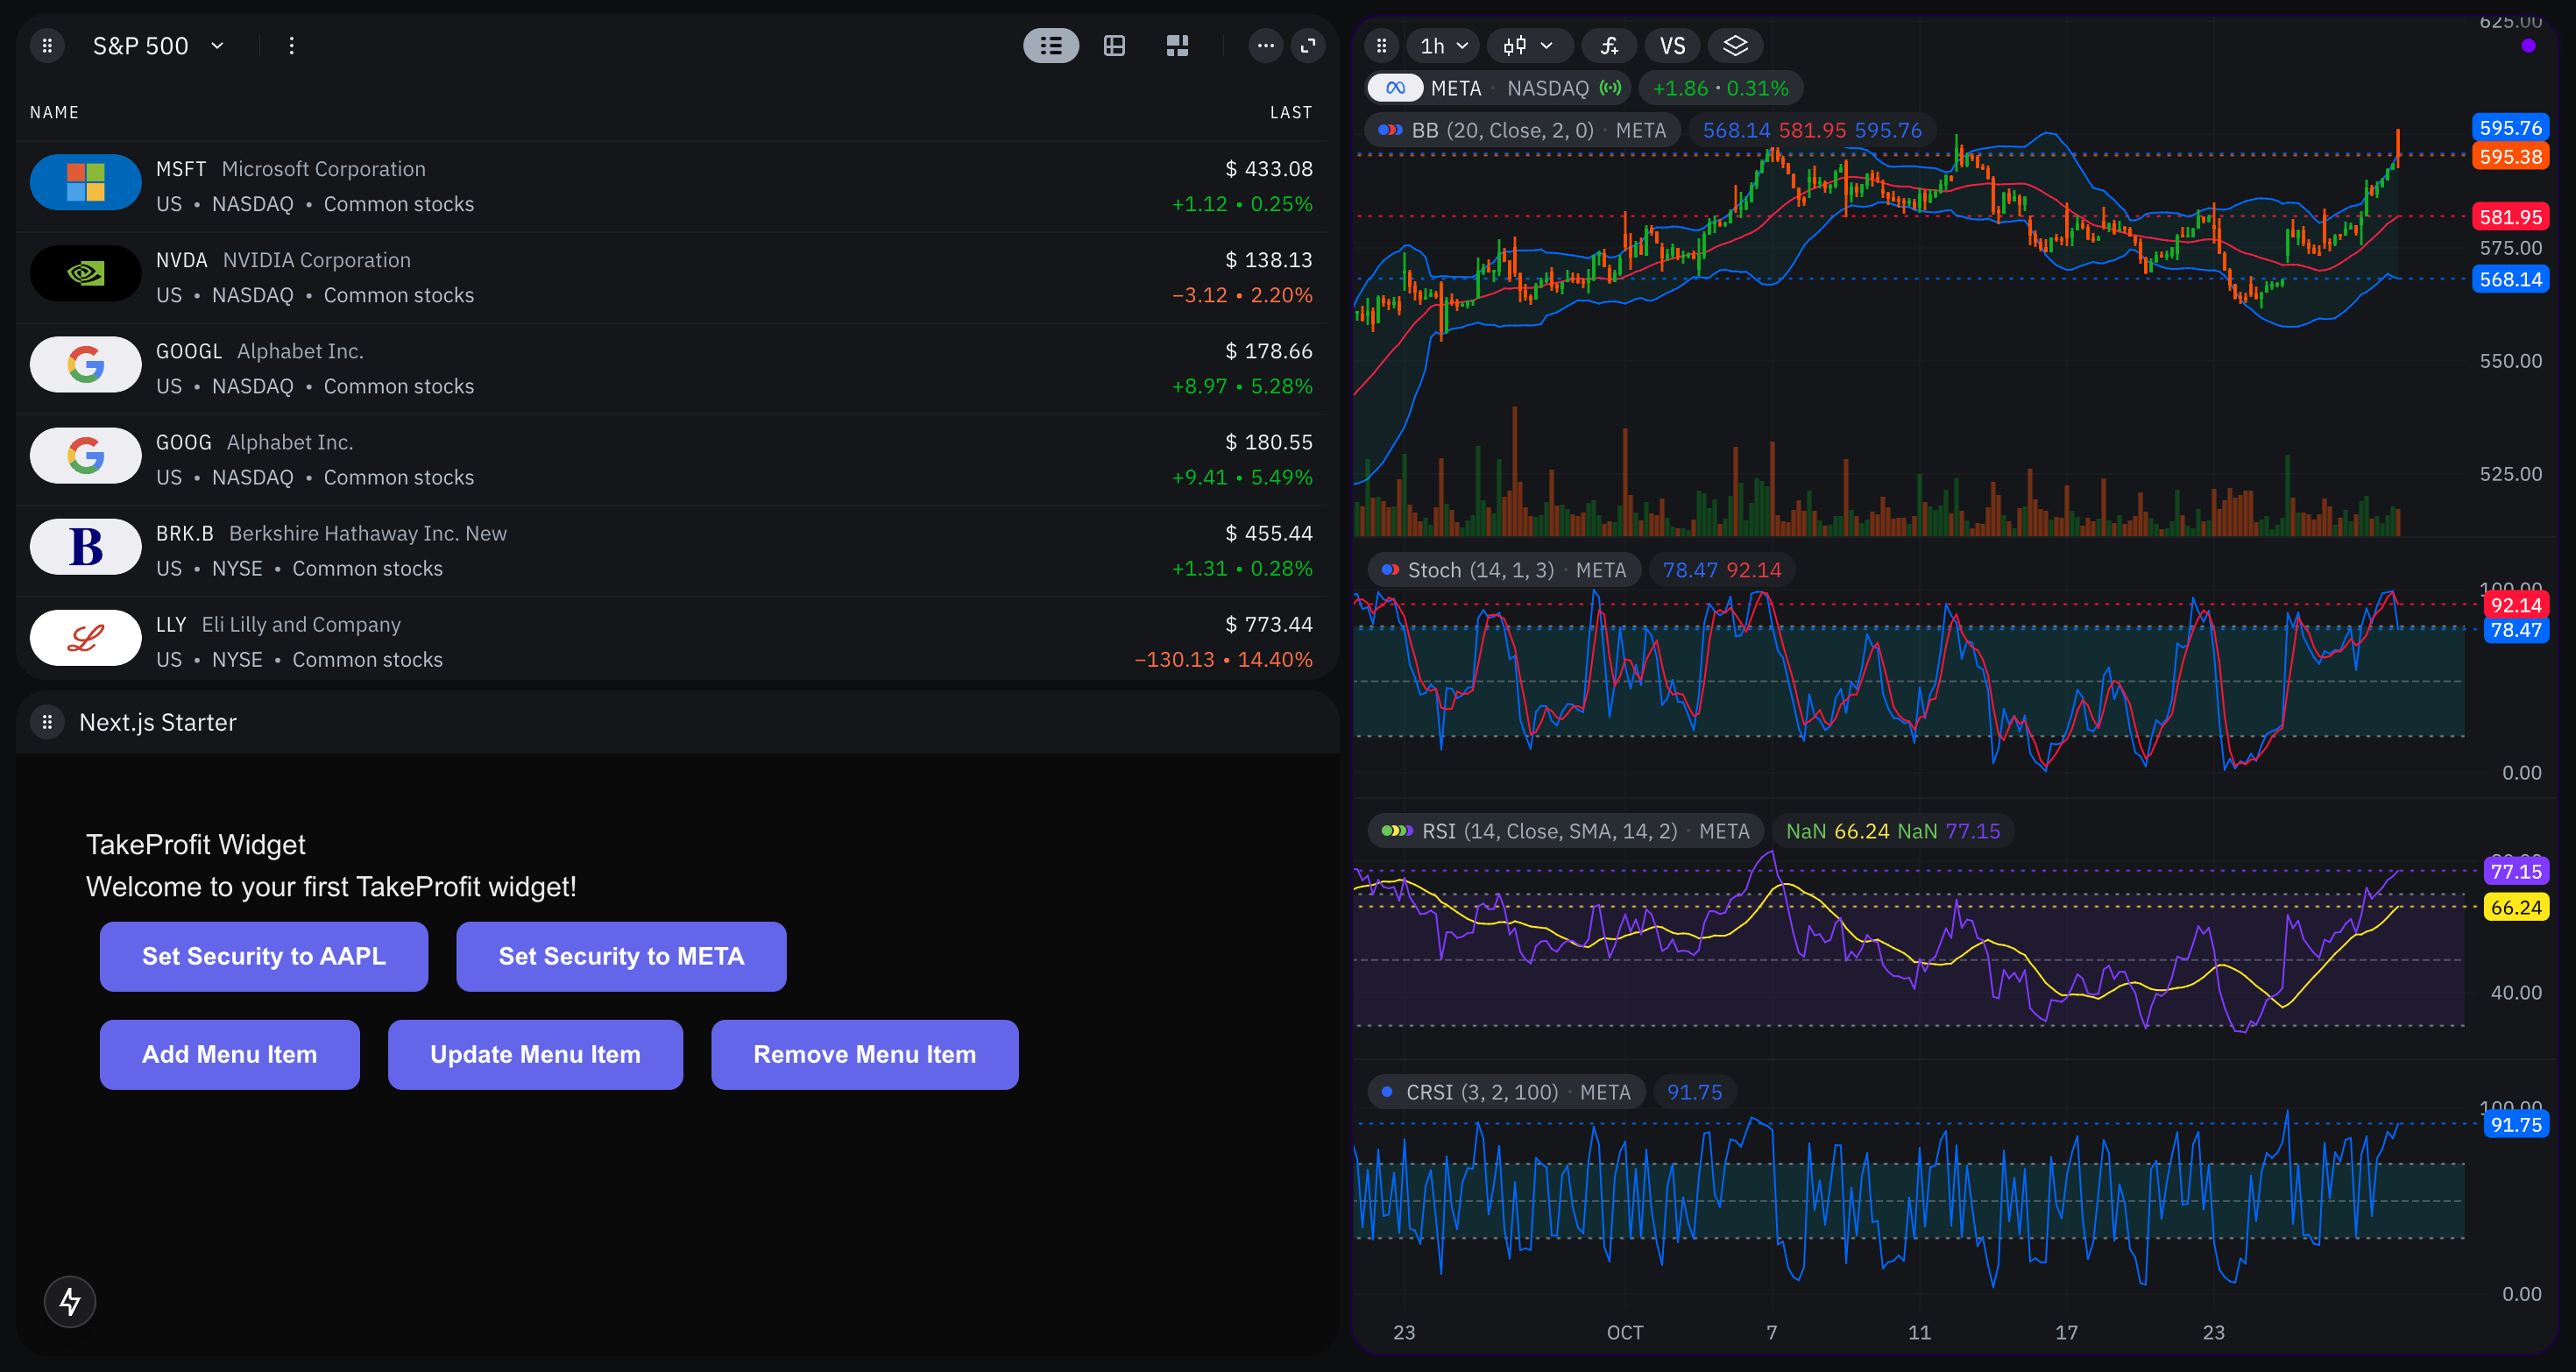
<img src="https://mintcdn.com/takeprofit/FAVyGWXnqS5GPuDj/images/first-widget.png?fit=max&auto=format&n=FAVyGWXnqS5GPuDj&q=85&s=d1ed37543e2d4d20d17da1d4858d7793" alt="Widget Example" width="2940" height="1566" data-path="images/first-widget.png" />

## Prerequisites

Before you begin, ensure you have the following:

* **Node.js** (v14 or higher) installed. You can download it from [Node.js Official Website](https://nodejs.org/).
* **npm** (comes with Node.js) or **Yarn** as your package manager.
* Basic knowledge of **React** and **Next.js**.
* Access to the **TakeProfit platform** for widget integration and testing.

***

## Set Up a Next.js Project with App Router

Next.js introduces the App Router, which provides a new way to organize your application's routes and components.

1. **Create a New Next.js Project**

   Open your terminal and run the following command to create a new Next.js project:

   ```bash theme={null}
   npx create-next-app@latest my-tp-widget
   ```

   Replace `my-tp-widget` with your desired project name.

2. **Navigate to Your Project Directory**

   ```bash theme={null}
   cd my-tp-widget
   ```

3. **Verify App Router is Enabled**

   Ensure that your project uses the App Router by checking the presence of the `app` directory.

   ```bash theme={null}
   ls
   ```

   You should see an `app` directory among others.

***

## Install the TakeProfit Widget SDK

Integrate the TakeProfit Widget SDK into your Next.js project to enable communication between your widget and the TakeProfit platform.

1. **Install the SDK via npm**

   ```bash theme={null}
   npm install takeprofit-widget-sdk
   ```

   Alternatively, if you prefer using Yarn:

   ```bash theme={null}
   yarn add takeprofit-widget-sdk
   ```

2. **Verify Installation**

   Check your `package.json` to ensure `takeprofit-widget-sdk` is listed under `dependencies`:

   ```json theme={null}
   "dependencies": {
     "takeprofit-widget-sdk": "^0.2.3",
     // other dependencies...
   }
   ```

***

## Create the Widget Page

Create a dedicated page for your widget within the App Router structure.

1. **Create the Widget Directory and Page**

   In the `app` directory, create a new folder named `widget` and add a `page.jsx` file:

   ```bash theme={null}
   mkdir -p app/widget
   touch app/widget/page.jsx
   ```

2. **Implement the Widget Component**

   Open `app/widget/page.jsx` and add the following code:

   ```jsx theme={null}
   // app/widget/page.jsx
   "use client";

   import { useEffect } from "react";
   import { TPWidgetSDK } from "takeprofit-widget-sdk";

   export default function WidgetPage() {
   	useEffect(() => {
   		// Initialize connection to the TakeProfit platform
   		TPWidgetSDK.connect();

   		// Notify the platform that the widget is ready
   		TPWidgetSDK.hideLoader();

   		// Subscribe to widget state changes
   		TPWidgetSDK.subscribeWidgetChange((newState) => {
   			console.log("Widget state updated:", newState);
   		});

   		// Subscribe to channel state changes
   		TPWidgetSDK.subscribeChannelChange((newChannel) => {
   			console.log("Channel state updated:", newChannel);
   		});

   		// Cleanup on unmount
   		return () => {
   			TPWidgetSDK.disconnect();
   		};
   	}, []);

   	// Function to change the security being viewed
   	const changeSecurity = (securityID) => {
   		TPWidgetSDK.requestChangeSecurity(securityID, (result) => {
   			if (result.payload.isSuccessful) {
   				console.log(`Security successfully changed to ${securityID}.`);
   			} else {
   				console.error(`Failed to change security: ${result.payload.error}`);
   			}
   		});
   	};

   	return (
   		<div className="p-10">
   			<h1>TakeProfit Widget</h1>
   			<p>Welcome to your first TakeProfit widget!</p>
   			<button
   				onClick={() => changeSecurity("AAPL;BATS")}
   				className={buttonClass}
   			>
   				Set Security to AAPL
   			</button>
   			<button
   				onClick={() => changeSecurity("META;BATS")}
   				className={buttonClass}
   			>
   				Set Security to META
   			</button>
   		</div>
   	);
   }

   const buttonClass =
   	"m-2 py-2.5 px-6 text-sm bg-indigo-500 text-white rounded-lg cursor-pointer font-semibold text-center shadow-xs transition-all duration-500 hover:bg-indigo-700";
   ```

   **Explanation:**

   * **Initialization**: The SDK is connected using `TPWidgetSDK.connect()`, and the loader is hidden with `TPWidgetSDK.hideLoader()`.
   * **Subscriptions**: The widget subscribes to state changes for both the widget itself and the associated channel.
   * **Security Change**: Provides buttons to change the displayed security to AAPL or META, demonstrating interaction with the platform.

***

## Configure Next.js Headers for Security

To ensure that your widget can be embedded securely within the TakeProfit platform, you need to configure specific HTTP headers in your Next.js application.

1. **Create or Update `next.config.js`**

   In the root of your project, create or modify the `next.config.js` file to include the following configuration:

   ```javascript theme={null}
   /** @type {import('next').NextConfig} */
   const nextConfig = {
   	async headers() {
   		return [
   			{
   				source: "/(.*)",
   				headers: [
   					{
   						key: "X-Frame-Options",
   						value: "ALLOW-FROM https://takeprofit.com",
   					},
   					{
   						key: "Content-Security-Policy",
   						value: "frame-ancestors 'self' https://takeprofit.com",
   					},
   				],
   			},
   		];
   	},
   };

   export default nextConfig;
   ```

   **Explanation:**

   * **`X-Frame-Options`**: This header controls whether your site can be embedded in an iframe. Setting it to `ALLOW-FROM https://takeprofit.com` allows the widget to be embedded only from the specified origin.
   * **`Content-Security-Policy`**: The `frame-ancestors` directive specifies valid parents that may embed a page using `<frame>`, `<iframe>`, `<object>`, `<embed>`, or `<applet>`. Setting it to `'self' https://takeprofit.com` allows framing from the same origin and the specified TakeProfit domain.

## Initialize the SDK and Handle Messages

Ensure that your widget properly handles incoming messages and maintains state accordingly.

1. **Understand the SDK's Internal Mechanisms**

   The SDK uses `postMessage` for communication between the widget (iframe) and the parent TakeProfit platform. It handles various message types to manage state and interactions.

2. **No Additional Configuration Needed**

   The SDK automatically manages message listeners upon calling `TPWidgetSDK.connect()`. However, ensure that your widget's domain is trusted by the TakeProfit platform to allow communication.

***

## Add Menu Items

Enhance your widget by adding custom menu items to the widget header.

Update your `WidgetPage` component to include functions for adding, updating, and removing menu items.

```jsx theme={null}
// Inside app/widget/page.jsx

import { useState } from "react";

export default function WidgetPage() {
	const [menuItemId, setMenuItemId] = useState(null);

	useEffect(() => {
		// Initialization code as before...
	}, []);

	const changeSecurity = (securityID) => {
		// Security change code as before...
	};

	const addMenuItem = async () => {
		try {
			const id = await TPWidgetSDK.addMenuItem("Refresh Data", () => {
				console.log("Refresh Data menu item clicked.");
				// Implement refresh logic here
			});
			setMenuItemId(id);
			console.log(`Menu item added with ID: ${id}`);
		} catch (error) {
			console.error("Failed to add menu item:", error);
		}
	};

	const updateMenuItem = async () => {
		if (menuItemId === null) return;
		try {
			const success = await TPWidgetSDK.updateMenuItem(
				menuItemId,
				false,
				"Refresh Data (Updated)"
			);
			if (success) {
				console.log("Menu item updated successfully.");
			}
		} catch (error) {
			console.error("Failed to update menu item:", error);
		}
	};

	const removeMenuItem = async () => {
		if (menuItemId === null) return;
		try {
			const success = await TPWidgetSDK.removeMenuItem(menuItemId);
			if (success) {
				console.log("Menu item removed successfully.");
				setMenuItemId(null);
			}
		} catch (error) {
			console.error("Failed to remove menu item:", error);
		}
	};

	return (
		<div className="p-10">
			<h1>TakeProfit Widget</h1>
			<p>Welcome to your first TakeProfit widget!</p>
			<button
				onClick={() => changeSecurity("AAPL;BATS")}
				className={buttonClass}
			>
				Set Security to AAPL
			</button>
			<button
				onClick={() => changeSecurity("META;BATS")}
				className={buttonClass}
			>
				Set Security to META
			</button>
			<br />
			<button
				onClick={addMenuItem}
				className={buttonClass}
			>
				Add Menu Item
			</button>
			<button
				onClick={updateMenuItem}
				className={buttonClass}
				disabled={menuItemId === null}
			>
				Update Menu Item
			</button>
			<button
				onClick={removeMenuItem}
				className={buttonClass}
				disabled={menuItemId === null}
			>
				Remove Menu Item
			</button>
		</div>
	);
}
```

**Explanation:**

* **State Management**: Uses React's `useState` to keep track of the added menu item's ID.
* **Add Menu Item**: Adds a menu item labeled "Refresh Data" with a callback that logs to the console.
* **Update Menu Item**: Updates the label of the existing menu item.
* **Remove Menu Item**: Removes the existing menu item.

***

## Test Your Widget Locally

Verify that your widget integrates correctly with the TakeProfit platform by testing it in a local environment.

1. **Start the Development Server**

   ```bash theme={null}
   npm run dev
   ```

   By default, Next.js runs on `http://localhost:3000`.

2. **Configure Local Storage for Testing**

   To simulate the widget's presence on the TakeProfit platform, configure local storage in your browser:

   * Open the TakeProfit platform in your browser.
   * Open the developer console (`F12` or `Ctrl+Shift+I`).
   * Execute the following command, replacing `<your-iframe-url>` and `<icon-url>` with your actual widget URL and an icon URL:

     ```javascript theme={null}
     localStorage.setItem(
     	"takeprofit.integrations.third_party_widget_options",
     	JSON.stringify([
     		{
     			iframeUrl: "http://localhost:3000/widget", // Your widget's URL
     			enableChannelSupport: false, // Set to true if your widget supports channels
     			title: "Next.js Widget",
     			imageUrl: "https://example.com/icon.png", // Replace with your icon URL
     		},
     	])
     );
     ```

3. **Reload the TakeProfit Platform**

   Refresh the TakeProfit platform page. Your widget should now appear in the widget panel, allowing you to add it to the dashboard and interact with its functionalities.

4. **Verify Functionality**

   * **Security Change**: Click on the "Set Security" buttons and observe the console logs for successful changes.
   * **Menu Items**: Add, update, and remove menu items, ensuring that callbacks are executed as expected.

***

## Deploy Your Widget

Once testing is successful, deploy your widget to a live environment.

1. **Build the Project**

   ```bash theme={null}
   npm run build
   ```

2. **Start the Production Server**

   ```bash theme={null}
   npm start
   ```

   Ensure that your widget is accessible over HTTPS in a production environment for secure communication with the TakeProfit platform.

3. **Update Local Storage Configuration**

   Replace the `iframeUrl` in local storage with your deployed widget's URL:

   ```javascript theme={null}
   localStorage.setItem(
   	"takeprofit.integrations.third_party_widget_options",
   	JSON.stringify([
   		{
   			iframeUrl: "https://yourdomain.com/widget", // Your deployed widget's URL
   			enableChannelSupport: false,
   			title: "Next.js Widget",
   			imageUrl: "https://yourdomain.com/icon.png", // Your widget's icon URL
   		},
   	])
   );
   ```

4. **Final Testing**

   Reload the TakeProfit platform and verify that your deployed widget functions correctly in the live environment.

***

## Best Practices

* **Unique Identifiers**: Ensure that `requestId` and `menuItemId` are unique to prevent conflicts.

* **Unsubscribe When Necessary**: Clean up subscriptions using `unsubscribeWidgetChange` and `unsubscribeChannelChange` to prevent memory leaks.

  ```javascript theme={null}
  useEffect(() => {
  	const handleWidgetChange = (newState) => {
  		console.log("Widget state:", newState);
  	};

  	TPWidgetSDK.subscribeWidgetChange(handleWidgetChange);

  	return () => {
  		TPWidgetSDK.unsubscribeWidgetChange(handleWidgetChange);
  	};
  }, []);
  ```

* **Error Handling**: Implement robust error handling for all asynchronous operations to enhance user experience.

* **Performance Optimization**: Limit the number of active subscriptions and avoid unnecessary state updates to maintain optimal performance.

* **Documentation**: Keep your code well-documented to facilitate maintenance and future enhancements.

***

## Next Steps

Congratulations on creating your first widget with the TakeProfit Widget SDK! To further enhance your widget, consider the following:

* **Explore Advanced SDK Features**: Dive deeper into the [SDK Reference](/docs/sdk/reference) to utilize all available methods and message types.
* **Implement Real-Time Data**: Integrate real-time data feeds to provide dynamic and up-to-date information within your widget.
* **Customize the UI**: Enhance the user interface with additional React components and styling to improve user engagement.
* **Add More Interactions**: Implement more interactive features like custom events, notifications, and user preferences.
* **Optimize**: Ensure your widget is responsive and functions seamlessly across different devices and screen sizes.

For more detailed information, refer to the complete [SDK Reference](/docs/sdk/reference) and other documentation resources provided by the TakeProfit Widget SDK.
